Crestron RF Gateway Setup
Crestron RF Gateways are a two-way radiofrequency (RF) transceivers that allow Crestron Zūm Wireless (ZUMMESH), infinetEX, or Extended Range wireless devices to communicate with the control processor over Ethernet. They are for Crestron wireless systems what DIN-CENCN-2s are for wired Cresnet systems.
Installations using infinetEX or Extended Range devices require the CEN-GWEXER gateway, while Zūm Wireless installations require the ZUMNET-GATEWAY. Throughout this article, "CEN-GWEXER" and "infinetEX" will be used to refer to the gateway and the wireless devices respectively.
For SHOWRUNNER™ installations, the IP address of the CEN-GWEXER does not matter as long as it is in the same range as the processor and does not conflict with any other devices on the network. Instead, CEN-GWEXERs are identified to the processor via their IP-ID. Note that which infinetEX devices are landed at which CEN-GWEXER matters, and if devices are moved between CEN-GWEXERs then the configuration will need to be updated (see below). Chief Integrations typically provides an SRTakeoff.xlsx spreadsheet with an IP Table tab that lists all the CEN-GWEXER IP-IDs in the program. If no takeoff is provided, then the processor's IP table can be checked by running the ipt -t command from the processor after the configuration is loaded. CEN-GWEXERs will typically have IP-IDs in the "Cx" range. For Zūm Wireless jobs using the Zūm Discovery process, the IP table portion of the IP Configuration should be skipped as the ZUMNET-GATEWAY IP table will be assigned and consumed at the time of discovery.
IP Configuration
Typically, each CEN-GWEXER will need to be initially configured via USB (microUSB) unless their MAC addresses are already known and the lighting network has a DHCP server. If the DHCP server on the network is temporary (e.g. DHCP server software running on your computer or a processor utilizing the ShowRunner™ DHCP Server), then static IP addresses must be configured. If the DHCP server is permanent (such as a CP4N or ZUM-HUB4 Control Subnet), then only the IP table needs to be configured for the devices.
When connecting to a CEN-GWEXER for the first time, it may be necessary to manually change the connection type from "Auto" to "SSL/TLS". It is also necessary to manually edit the CEN-GWEXER's address book entry so that the connection protocol is "SSL/TLS" when a CEN-GWEXER is added to the address book using Device Discovery tool export.
SSL Setup
Crestron devices that support SSL require the use of a secure connection between the processor and the device. In order to establish this secure connection, the processor must have authentication enabled and there must be a user on the processor with "Connects" group permissions. The device connecting to the processor must be configured to use these credentials before the processor is added to the IP table, otherwise the device's IP address will be blocked by the processor (see ). The Crestron Agent or Field Tech are responsible for recording these credentials. If these Credentials are lost but the admin credentials to the device are known, then new SSL credentials can be set up. Chief Integrations cannot provide assistance if the credentials are not known. The only way to connect to a device for which the credentials have been lost is to factory reset the device, which may require redoing the start-up from scratch.
Configure the Connects user on the processor:
- Ensure the processor has its IP configured and authentication enabled
- Verify the processor has authentication enabled by running the command: auth without any parameters
- Create a user by running the following commands, replacing the "username" and "password" with your desired credentials
- adduser -N:username -P:password
- addusertogroup -N:username -G:Connects
- Verify that the user has been created by running the command: listusers
- This process only needs to be performed once per processor on the jobsite
Configure the CS authentication on the CEN-GWEXER:
- Run the following command, replacing the "username" and "password" with the credentials of the Connects user from the previous step
- setcsauth -N:username -P:password
- Repeat this process for every CEN-GWEXER on the jobsite
DHCP Configuration
If the lighting network has a permanent DHCP server, then CEN-GWEXERs only require their IP table to be configured, though it is good practice to also record or update their hostname. If the MAC addresses for the CEN-GWEXERs are not known, then the best way to update their configuration is via USB (microUSB). If you are able to identify the CEN-GWEXERs by MAC address, then it is possible to configure these settings via Ethernet using Text Console. Whether connected to the CEN-GWEXER via USB or Ethernet, the process to configure the IP table and hostname is the same:
- Open Text Console in Toolbox and connect to the CEN-GWEXER
- Note that you may need to manually select "SSL" connection type, as "Auto" might not always redirect
- Run the following commands to configure the CEN-GWEXER's IP table and hostname (example is for an IP-ID of C1, and a target processor IP address of 172.22.0.1, and a device hostname of GWEXER-L1)
- Update IP table: addm C1 172.22.0.1
- Skip for Zūm Discovery jobs: IP table is automatically assigned at time of discovery
- Set hostname: host GWEXER-L1
- Reboot the CEN-GWEXER: reboot
- Update IP table: addm C1 172.22.0.1
- At this point, it is a good idea to update the device firmware
- Repeat for all CEN-GWEXERs on the job
If setup has been done correctly and the ShowRunnerCLC™ program and configuration have already been loaded to the processor, then you should see the CEN-GWEXER's IP-ID reporting online when you run the ipt command on both the CEN-IO and the processor.
Static Configuration
If there is no permanent DHCP server on the lighting network, then CEN-GWEXERs should be configured with static IP addresses via USB (micro USB). If a temporary DHCP server is connected to the lighting network and you are able to identify CEN-GWEXERs by MAC address, then it is possible to configure these settings via Ethernet using Text Console. Whether connected via USB or Ethernet, the process to configure the static IP addresses is the same:
- Open Text Console in Toolbox and connect to the CEN-GWEXER
- Note that you may need to manually select "SSL" connection type, as "Auto" might not always redirect
- Run the following commands to configure the CEN-GWEXER's static IP settings (example is for a 10.0.0.0/24 subnet, with a static IP address of 10.0.0.12, an IP-ID of C1, and a target processor IP address of 10.0.0.10, and a device hostname of GWEXER-L1)
- Set IP address: ipa 0 10.0.0.12
- Set IP subnet mask: ipm 0 255.255.255.0
- Set default gateway: defr 0 10.0.0.1
- Disable DHCP: dhcp off
- Update IP table: addm C1 10.0.0.10
- Set hostname: host GWEXER-L1
- Reboot the CEN-GWEXER: reboot
- At this point, it is a good idea to update the device firmware
- Repeat for all CEN-GWEXERs on the job
If setup has been done correctly and the ShowRunnerCLC™ program and configuration have already been loaded to the processor, then you should see the CEN-GWEXER's IP-ID reporting online when you run the ipt command on both the CEN-IO and the processor.
RF Channel
Crestron wireless devices have 16 non-overlapping channels numbered 11-26 to prevent and avoid RF interference either from other appliances in the building (such as microwaves or Wi-Fi routers) or from other Crestron devices that are attempting to communicate with different CEN-GWEXERs.
By default, all CEN-GWEXERs will ship with the same RF channel, so for jobs where interference may be an issue it is necessary to manually change the RF channel of the CEN-GWEXERs. When selecting which RF channel to use for each CEN-GWEXER, it is best to avoid using the same RF channel for any CEN-GWEXERs that are adjacent to each other (whether they are adjacent on the same floor or whether they are adjacent on top of/below each other by virtue of being installed in the same location on different floors). See Crestron's RF Products Best Practices guide for more details on RF channel selection.
- If using Text Console, run the command: rfchannel [#]
- Replace "[#]" with the desired RF channel
- If using the Gateway Configuration tool:
- Connect to the CEN-GWEXER in another tool such as Text Console
- Navigate to Functions > Gateway Configuration... to open the tool
- At the top left, under "RF Channel", ensure "Fixed" is selected and then choose a channel
- The Gateway Configuration window will become nonresponsive while the RF channel is being applied to the gateway
- Close the tool once the change has been applied
- Once the RF channel has been updated, verify it by running the command: rfchannel without any parameters
Acquiring and Addressing Devices
Unlike wired Cresnet devices such as DIN-CENCN-2s or processors which can poll the connected Cresnet and report all devices that are currently connected, CEN-GWEXERs and other wireless gateways must first acquire the wireless Crestron devices. Acquiring wireless Crestron devices involves putting the gateway into acquire mode and then performing a physical button press sequence on each of the wireless devices to be acquired. This process is described in detail below:
- Put the CEN-GWEXER into acquire mode using one of the methods below:
- If using Text Console, run the command: acquire start
- Devices will indicate their TSID in the Text Console window as they are acquired
- If using the Gateway Configuration tool:
- Connect to the CEN-GWEXER in another tool such as Text Console
- Navigate to Functions > Gateway Configuration... to open the tool
- At the bottom left, click "Start Acquire"
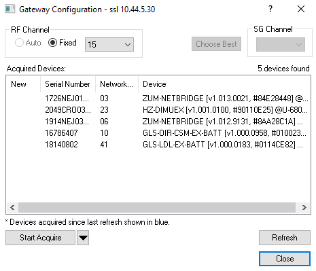
- Wait for the confirmation dialog and click "OK" to close the confirmation dialog
- Previously acquired devices will be displayed with black text, while newly acquired devices will populate with blue text
- Using the Gateway Configuration tool to acquire hardware may be preferable to using Text Console as acquired devices will report their Serial Number as they are acquired instead of just their TSID
- If using Text Console, run the command: acquire start
- The process for acquiring a wireless device to a gateway varies for each model, but generally the procedure is as follows:
- Press the "setup" button (top button for keypads) in the sequence press-press-press-hold
- Do not release the button until the setup LED (top feedback LED for keypads) begins blinking slowly
- If the setup LED turns steady, then the device was acquired successfully
- If the setup LED begins to rapidly blink, then the acquire failed
- Press the "setup" button again to cancel acquire
- Attempt to acquire the device again
- If the device fails to acquire a second time: verify that the correct gateway is in acquire mode, verify that no other gateways are in acquire mode, verify that the desired gateway is close enough to the device that it should be able to acquire, and verify that there are no other sources of RF interference that may be preventing acquisition.
- Repeat for all wireless devices that need to be acquired to the gateway
- Once all devices have been acquired, take the CEN-GWEXER out of acquire mode:
- If using Text Console, run the command: acquire stop
- If using the Gateway Configuration tool, click the "STOP Acquire" button in the lower left
- Address devices as indicated in the SHOWRUNNER™ takeoff by either:
- Use Text Console to run the command: setrfidbytsid [CID] [TSID]
- Replace "[CID]" with the connection ID as indicated in the takeoff
- Replace "[TSID]" with the 4-byte, hexadecimal TSID of the device to be addressed
- Use Network Device Tree View to select each device and address them individually
- Use Text Console to run the command: setrfidbytsid [CID] [TSID]
- Verify all devices have been acquired and addressed correctly using Network Device Tree View or with the Text Console command: reportnetdev
Moving/Removing Devices (Unacquiring Devices)
When a wireless Crestron device is acquired to a new gateway using the typical acquiring process described above, it will automatically forget the previously connected gateway. The gateway itself, however, must manually "forget" the previously connected device before a newly acquired and addressed device will function correctly. This is necessary whether the originally connected device is moved or if the originally corrected device has failed and is being replaced.
To unacquire a device from a gateway, it is necessary to run the below commands, replacing "[TSID]" with either the 4-byte hexadecimal TSID of a single device or "all" to forget all previously acquired devices. Devices do not need to be online in order to be acquired (e.g., a failed device can still be unacquired using this method). While only one of these commands needs to be run per device, it is not documented which command (ending in "0" or "1") is required for each model, so it is generally advisable to run both commands for each device to be unacquired:
- unacquirebytsid [TSID] 0
- unacquirebytsid [TSID] 1
Once all of the necessary TSIDs have been unacquired, use the reboot command to reboot the gateway and complete the unacquire process.