Processor Setup
ShowRunnerCLC™ Installation Tutorial:
https://www.youtube.com/watch?v=xuJ94cMCCa8
Licensing tutorial:
Note: Please use Chrome or Firefox to download the License from https://portal.chiefintegrations.com. Edge and Internet Explorer do not work properly.
https://www.youtube.com/watch?v=H8CLZ7bp0eI
Error Broadcasting
The first thing that should be done after connecting to a processor is to open the Text Console and run the command: broadcast on
Running the broadcast on command tells the processor to begin logging useful messages to the text console and error log. These messages typically begin with an indication of their severity:
- Error: Most errors indicate a major issue that should be investigated and remedied. Some errors will prevent the ShowRunner™ program from starting up or functioning as expected, and may be the result of a configuration issue (e.g. errors registering devices), a network issue (e.g. errors connecting to other devices), or authentication issues (e.g. errors related to connection attempts from clients not providing correct username/password information), among other possible causes.
- Warning: Warnings indicate issues that are less severe than errors and do not usually prevent the ShowRunner™ program from running, but may result in some unexpected behaviors.
- Notice: Notices are not a problem, and just give useful information during program startup (e.g. devices registered) and while the program is running (e.g. the times at which scheduled events are triggered)
Running the err sys command will print the most recent 500 messages to the console. Running the clear err command will clear the log, which is sometimes useful to run before doing a progreset in order to troubleshoot configuration issues on startup.
To view more than the last 500 messages, connect to the processor with the File Manager tool and navigate to the "Internal Storage > logs" folder. Logs since the last time the processor rebooted are stored in the "CurrentBoot" folder, with a new log started every time the current log reaches ~1 MB in size. When the processor reboots, the logs in the "PreviousBoot" folder are zipped and moved to the "ZippedLogs" folder, logs in the "CurrentBoot" folder are moved to the "PreviousBoot" folder, and a new log is started in the "CurrentBoot" folder.
IP Configuration
- Connect to the processor via USB and set the processor’s IP Address per your network requirements
- When connecting to a 4-Series processor or a 3-Series processor with authentication enabled for the first time, it will prompt for the creation of an admin-level CWS user
- Input the desired username and password into the dialog box. Save this login information, as it is not possible to recover if it is lost or forgotten
- In the event that the processor does not allow you to log in with the chosen credentials (i.e. it repeatedly prompts for credentials)
- Attempt to log in with username "crestron" and no password
- Once logged into Text Console, run the following commands, replacing the "username" and "password" with your desired credentials
- adduser -N:username -P:password
- addusertogroup -N:username -G:Administrators
- Once connected, open Text Console and run the following commands to configure the processor's IP settings (example is for a 10.0.0.0/24 subnet, with a processor IP address of 10.0.0.10)
- Disable DHCP: dhcp 0 off
- Set IP address: ipa 0 10.0.0.10
- Set IP subnet mask: ipm 0 255.255.255.0
- Set default gateway: defr 0 10.0.0.1
- Set hostname: host AP3-CPP
- Reboot the processor: reboot
- It is also possible to configure a processor over Ethernet by using a DHCP server software on your laptop to assign an IP address
- Configure your DHCP server software to assign IP addresses in the desired range
- Once the processor is assigned an IP address, connect to it via Text Console at the assigned IP address
- Run the above commands to disable DHCP and assign a static IP address to the processor
- When connecting to a 4-Series processor or a 3-Series processor with authentication enabled for the first time, it will prompt for the creation of an admin-level CWS user
- For processors with a Control Subnet (CP3N/AV3/PRO3/CP4N/AV4/PRO4), there are some additional considerations and setup that must be performed:
- Never connect an external router to the Control Subnet, as doing so will cause the internal DHCP server to shut down.
- Never set the LAN IP address to an address that is in the range of the Control Subnet
- e.g. for a processor with the default 172.22.0.0/20 Control Subnet configuration, the LAN IP address must be below 172.22.0.0 or above 172.22.15.255
- Always set devices on the Control Subnet to DHCP so that their IP addresses are managed by the built-in DHCP server. Only set static IP addresses on the Control Subnet if you really know what you are doing.
- If setting static IP addresses on the Control Subnet for any reason: always assign an address within the Control Subnet range, but never use the first two or the last address in the range
- e.g. for a processor with the default 172.22.0.0/20 Control Subnet configuration, IP addresses must be in the range 172.22.0.3 through 172.22.15.254
- 172.22.0.0 is not a valid address, 172.22.0.1 is taken by the processor, 172.22.0.2 is taken by the DHCP server (default gateway), and 172.22.15.255 is the broadcast address for the Control Subnet
- Connect to the processor via Text Console and run the command: startprogafterrouter on
- This will force the processor to wait until the router has started before attempting to load the ShowRunnerCLC™ program, avoiding potential license validation issues if the processor boots up before the router.
- ShowRunnerCLC™ .puf versions 3.042 and newer automatically run this command when the "Configure Processor with Router" option is selected.
- The previously listed "ipa," "ipm," etc. commands will configure settings for the processor's LAN port, which should be connected to the building LAN or third party network.
- Lighting control hardware (e.g. TSWs, DIN-CENCN-2s, etc.) should be left in DHCP mode and connected to the Control Subnet port.
- The processor acts as a DHCP server on the Control Subnet, with addresses that are determined automatically based on the LAN configuration.
- If lighting hardware is to be connected via the LAN anyway, then you must run the command: securegateway default
- Note: this setting enables unsecure connections to the processor from the LAN. This is necessary if ZUMNET-JBOXs or other non-secure Crestron devices (such as 3-Series EISC) will be connected via the LAN port of the processor
- The Control Subnet will automatically configure itself based on the LAN configuration, but it should be configured manually if the processor is to be connected to building LAN as the default scheme may cause networking issues:
- Using the "Functions>Ethernet Addressing...>Control Subnet" menu of Toolbox:
- Set routing to "Manual" with the start address and subnet size
- E.g., a setting of "100.64.0.0/20" will have the processor at 10.64.0.1 with an IP mask of 255.255.240.0 and a default gateway and DNS server at 100.64.0.2
- Using Text Console commands (example for a 100.64.0.0/20 subnet, with a processor IP address of 100.64.0.1)
- Set CS IP: csrouterprefix 100.64.0.0/20
- Reboot the processor: reboot
- Using the "Functions>Ethernet Addressing...>Control Subnet" menu of Toolbox:
- If the job has multiple processors, then these steps must be repeated for all processors on the job
- For jobs with Central Control, the IP addresses of the processors matters
- Chief Integrations will provide an SRTakeoff.xlsx spreadsheet with an IP Table tab that lists the IP address for each processor. If these IP addresses must be changed during startup, then it will be necessary to also change the IP addresses in the Remote System Definition in the configuration file
- See the CoAP Setup Guide for details
Firmware Update
At this point, it is a good idea to update the device firmware, bearing in mind any device-specific firmware stepping requirements.
Program Load
- Download the latest build of ShowRunnerCLC™ from the Chief Integrations Portal
- Connect your computer to the same network as the processor. Make sure your computer’s IP settings are compatible with the lighting network and do not conflict with any devices already on the network
- While it is possible to load the program via USB, it is not recommended because the transfer speed is significantly slower than loading via Ethernet
- Double click the PUF to open the Package Update Tool and install ShowRunnerCLC™ (works best with Toolbox closed)
- The Package Update Tool will automatically open your Address Book and prompt you to select a device
- If you have not created an Address Book for this job, close the Address Book window and press the pencil icon
- Type in the IP address of your processor and click "OK"
- Double check that the correct PUF file is listed under the "Package Info" section and that the correct IP address is listed under "Target"
- Press the "Recheck" button
- Make sure that all three tasks are selected ("Load ShowRunner Program", "Update Crestron App", and "Update XPanel")
- Additional tasks are available for certain processors:
- ZUM-HUB4:
- "Configure ZUM-HUB4" will automatically run commands: cwsanticsrf OFF and startprogafterrouter on
- "Configure ZUM-HUB4 Subnet" will automatically reconfigure the control subnet to a 100.64.0.0/20 configuration to avoid potential conflicts with corporate networks
- NOTE: If you are connected to the Control Subnet and select this option, you will need to reconnect to the processor and run the .puf again in order to finish loading ShowRunnerCLC™ as this option will interrupt your connection to the processor.
- "Configure ZUM-HUB4 SecureGateway" will automatically run command: securegateway default
- Processors with Routers (AV3, CP3N, PRO3, AV4, CP4N, and PRO4)
- "Configure Processor with Router" will automatically run command: startprogafterrouter on
- ZUM-HUB4:
- Press the "Update" button to begin loading ShowRunnerCLC™
- The Package Update Tool will automatically open your Address Book and prompt you to select a device
- Sometimes the PUF tool will falsely report a failure to load the program
- Connect to the processor via Text Console
- Run the command sr ver
- If the console returns with the newly installed version of ShowRunnerCLC™, then the installation was successful
- If the console returns with "Bad or Incomplete Command (sr)" then the installation was not successful
- Rename the downloaded .puf file to be a .zip file and open the archive
- Some file archivers (such as 7-Zip) allow you to right click on the PUF file and open the archive without changing the filetype
- Extract the "CI.Lighting.ShowRunner.cpz" file
- In Toolbox, connect to the processor via Text Console, click the lightning bolt icon, and select "SIMPL Program..."
- Alternatively, navigate to Functions>SIMPL Program...>SIMPL Program (Program01)...
- Under the "Send Program" section, browse your PC and select the extracted .cpz file
- Click the "Send" button and click "Yes" to upload the program
- Once it is done loading, you should be able to run the sr ver command and see the currently installed version of ShowRunnerCLC™
- Rename the downloaded .puf file to be a .zip file and open the archive
- Once ShowRunnerCLC™ is loaded, you can connect to the UI by navigating to the processor’s IP. A license and configuration file are still required.
- 3-Series processors require authentication enabled ("ssl self" command followed by a reboot can be used but steps will need to be repeated)
- If stuck on "Connecting to Processor" you will need to accept the certificate
- For jobs with multiple processors, ShowRunnerCLC™ will need to be loaded to each processor
License and Configuration Deployment
- Download the SrConfig.json or CiLightingConfig.json configuration file from the link provided by Chief Integrations
- Obtain and download the license from https://portal.chiefintegrations.com
- Processors with a Control Subnet should use the LAN MAC address, not the Control Subnet MAC address
- The license and configuration can be loaded with Toolbox using Text Console and File Management, or through the ShowRunnerHUB™ web interface
- Using Toolbox:
- Connect to the processor via Text Console and via File Management
- In File management, navigate to the "NVRAM>sr" folder from the left-hand menu
- Right-click on the right-hand side and select "Copy File(s) From..." and select the downloaded License.lic file
- Alternatively, drag and drop the file from your computer to the File Management tool
- Using the left-hand menu, navigate to the "NVRAM>sr>default" folder
- Right-click on the right-hand side and select "Copy File(s) From..." and select the downloaded SrConfig.json file
- Alternatively, drag and drop the file from your computer to the File Management tool
- If you downloaded a CiLightingConfig.json file, it must be renamed to "SrConfig.json"
- Note: when loading the license and configuration through Toolbox, the "License.lic" file and "SrConfig.json" file must have exact filenames
- If the files were automatically numbered during download (e.g. by adding a "(1)" or "(2)" to the end of the filename), the files must be renamed before loading them to the processor
- Using the ShowRunnerHUB™ UI:
- Using Chrome or Firefox, navigate to the processor's IP address
- When prompted, input your credentials and log in
- 4-Series processor or 3-Series processor with authentication enabled: Log in using the same admin credentials used to connect to the processor
- 3-Series processor without authentication enabled: Connect to the processor via Text Console and run the following command, replacing the "username", "name" and "password" with your desired credentials.
- sradmin add user username "name" Administrators password
- The username and password should be one word each and are the credentials used to log in to the ShowRunnerHUB™
- The name can be multiple words as long as it is in quotes, and is simply a friendly name used to identify each user
- Once logged in to the ShowRunnerHUB™ UI, you should be automatically redirected to the File Management page
- If you are not automatically redirected, then you can navigate to this page by clicking "Setup" in the top right and then selecting "File Management" from the list on the left
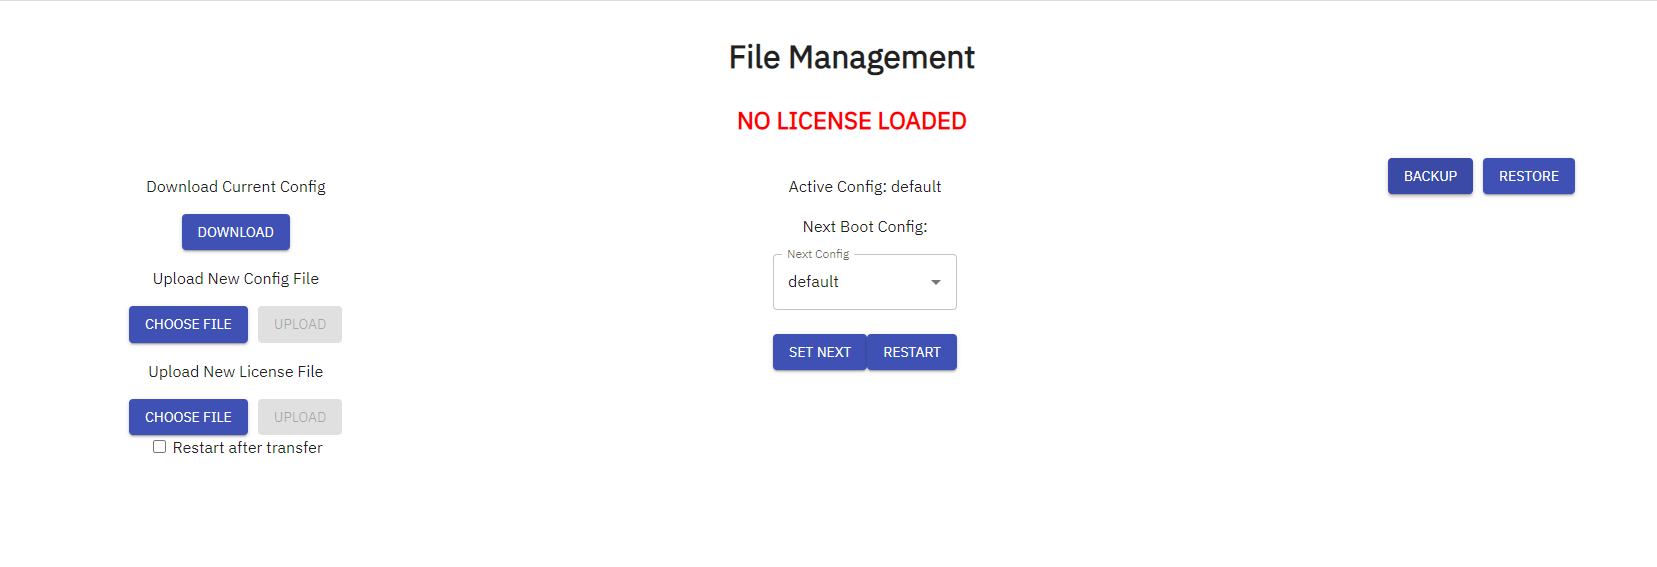
- Under “Upload New License File”
- Leave "Restart after transfer" unchecked
- Select “Choose File” and browse for the license file you downloaded from the portal
- Select “Upload”
- Load the configuration file either directly (if you have an SrConfig.json file) or from a backup (if you have an SRBackup.zip)
- Direct upload:
- Under “Upload New Config File”
- Select “Choose File” and find the provided CiLightingConfig.json or SrConfig.json file for this processor from the project link that was sent at project delivery.
- Select “Upload”
- From a Backup:
- Select "Restore"
- Select "Choose Backup" and find the SRBackup.zip of the backup you wish to restore
- Enter the secret used to create the backup. ShowRunner will upload the file and verify the secret.
- Direct upload:
- Once both the license and either a configuration file or backup have been loaded, click "Restart"
- Wait for the processor to finish restarting and then reload the page.
- 3-Series processors will take 45 to 90 seconds to restart, possibly longer depending on the size and complexity of the configuration
- 4-Series processors will restart considerably faster
- If licensed for SR-BNI, you will need to generate a free Crestron BACnet License
- If licensed for SR-BNI50, you will need to generate a paid Crestron 50+ BACnet Point License
- Using Toolbox:
Set System Time
It is important for the device clock to be accurate in order for scheduled events to trigger at the appropriate time. If Toolbox is still open, this can be done easily:
- Connect to the processor via Text Console
- At the top of the Toolbox window, navigate to Functions>System Clock...
- If your computer is in the correct timezone, click Synchronize Device Time with PC
- The Timezone and Device Time should synchronize automatically
- If your PC is in the incorrect Timezone or the time did not synchronize properly, then manually adjust the Time, Date, and Timezone
- Press the Apply button
Note that the Location given in the System Clock... menu of Toolbox is not used by ShowRunnerCLC™. Instead, the location used for sunrise/sunset calculations is stored in the configuration and will typically be set by Chief Integrations prior to delivery of the configuration. Both the location and time can be viewed and edited using the ShowRunnerCLC™ UI
- ShowRunnerCLC™ XPanel UI:
- Navigate to Settings>Location and System Clock
- Press the Lock icon to enable editing
- Adjust the time, timezone, and location as necessary
- Press Set System Clock to save the changes
- ShowRunnerHUB™ Web UI:
- Navigate to Setup>System Settings>Location and System Clock
- Adjust the time, timezone, and location as necessary
- Click Apply to save the changes