TSW Touchpanel Setup
TSWs touchscreens allow end users and technicians access to the ShowRunnerCLC™ XPanel UI for both initial startup and daily use. Once the TSW has been configured and the ShowRunnerCLC™ project has been loaded to it, it is possible to restrict what features can be accessed without entering a PIN code by navigating to Settings>Security Settings on the TSW. If the User Passcode is enabled, then a PIN will be required to access any of the touchscreen's UI. If the Setup Passcode is enabled, then the main Area Overview menu will be accessible, but anything in the Settings menu and beyond will require a PIN.
For TSWs, their IP address does not matter as long as it is in the same range as the processor andd does not conflict with any other devices on the network. Instead, TSWs are identified to the processor via their IP-ID. Each ShowRunnerCLC™ job ships by default with two touchscreens in the configuration, at IP-IDs 10 and 11. If a job has more than two touchscreens, then additional touchscreens will be added to the configuration, typically starting at IP-ID 14. Refer to the IP Table sheet in the provided SRTakeoff.xlsx spreadsheet, or run the ipt -t command from the processor after the configuration is loaded if no spreadsheet was provided.
IP Configuration
Typically, each TSW touch panel will need to be initially configured using the TSW user interface at the panel, unless their MAC addresses are already known and the lighting network has a DHCP server. If the DHCP server on the network is temporary (e.g. DHCP server software running on your computer or a processor utilizing the ShowRunner™ DHCP Server), then static IP addresses must be configured. If the DHCP server is permanent (such as a CP4N or ZUM-HUB4 Control Subnet), then only the IP table needs to be configured for the devices.
DHCP Configuration
If the lighting network has a permanent DHCP server, then TSWs only require their IP table to be configured, though it is good practice to also record or update their hostname. If the MAC addresses for the TSWs are not known, then the best way to update their configuration is from the TSW itself by entering into setup mode:
- Put 5 fingers on the front of the TSW and hold for approximately 10 seconds until the TSW enters setup mode
- TSW-xx70 series or TSW-xx60 series with authentication enabled will require admin credentials
- If this is the first time entering setup on a TSW-xx70, it will prompt for a username and password in order to create an admin account. Do not lose or forget these credentials.
- Navigate to the IP Table Setup
- Press the "Add/Edit" button for the first IP table entry
- Edit the CIP ID to be the required IP ID of the TSW (e.g. 10 or 11)
- Edit the IP Address / Hostname to be the IP Address of the processor (e.g. 172.22.0.1)
- Edit the Port to be 41794 if it is not already
- Press the green Save button
- If updating the hostname:
- Return to the main settings menu by pressing the Back button on the top right
- Navigate to the Ethernet Setup menu
- Use the Set Hostname menu to change the TSW's hostname
- Press Apply Changes and then press Reboot
- If leaving the hostname at the default, then exit the IP Table Setup menu using the "Save & Exit" button
- At this point, it is a good idea to update the device firmware
- Repeat these steps for all TSWs on the job
If you are able to identify TSWs by their MAC address, then it is possible to configure these settings via Ethernet using Text Console:
- On jobs with multiple TSWs, they can be identified using Device Discovery and matching the MAC address of the TSW to the IP address assigned by the DHCP server
- Once connected, open Text Console and run the following commands to configure the TSW's IP settings (example is for a TSW IP-ID of 10, a target processor IP address of 172.22.0.1, and a TSW hostname of TSW-L1)
- Update IP table: addm 10 172.22.0.1
- Set hostname: host TSW-L1
- Reboot the TSW: reboot
Static Configuration
If the network has no permanent DHCP server, then TSWs should be configured with static IP addresses in the same range as the processor. This can be done from the TSW itself by entering into setup mode:
- Put 5 fingers on the front of the TSW and hold for approximately 10 seconds until the TSW enters setup mode
- TSW-xx70 series or TSW-xx60 series with authentication enabled will require admin credentials
- If this is the first time entering setup on a TSW-xx70, it will prompt for a username and password in order to create an admin account. Do not lose or forget these credentials.
- Navigate to the IP Table Setup
- Press the "Add/Edit" button for the first IP table entry
- Edit the CIP ID to be the required IP ID of the TSW (e.g. 10 or 11)
- Edit the IP Address / Hostname to be the IP Address of the processor (e.g. 10.0.0.10)
- Edit the Port to be 41794 if it is not already
- Press the green Save button
- Return to the main settings menu by pressing the Back button on the top right ("Save & Exit" will exit out of setup mode completely, and require using 5 fingers to re-enter setup mode)
- Navigate to the Ethernet Setup menu
- Set DHCP Enable to "Off"
- If desired, use the Set Hostname menu to change the TSW's hostname
- Enter the "Set Static IP Address Settings" menu and set the IP settings per your network requirements
- Press Apply Changes and then press Reboot
- At this point, it is a good idea to update the device firmware
- Repeat these steps for all TSWs on the job
If operating on a network with a temporary DHCP server (either by running DHCP server software on your computer, or if the processor has a control subnet or is running the ShowRunnerCLC™ DHCP Server) and you are able to identify TSWs by their MAC address, then it is possible to configure these settings via Ethernet using Text Console:
- On jobs with multiple TSWs, they can be identified using Device Discovery and matching the MAC address of the TSW to the IP address assigned by the DHCP server
- Once connected, open Text Console and run the following commands to configure the TSW's IP settings (example is for a 10.0.0.0/24 subnet, with a TSW IP address of 10.0.0.19, a TSW IP-ID of 10, a processor IP address of 10.0.0.10, and a TSW hostname of TSW-L1)
- Set IP address: ipa 0 10.0.0.19
- Set IP subnet mask: ipm 0 255.255.255.0
- Set default gateway: defr 0 10.0.0.1
- Disable DHCP: dhcp 0 off
- Update IP table: addm 10 10.0.0.10
- Set hostname: host TSW-L1
- Reboot the TSW: reboot
- Note that TSW-xx70 firmware versions 2.001.0058 and above require a pingable gateway be specified for static IP settings. If no default gateway is set, or the default gateway cannot be pinged, then you are very likely to experience odd network behavior and system instability.
Load the ShowRunnerCLC™ Project
Once all the TSWs have been configured with the required IP settings and have had their IP tables updated, connect to the lighting network with a laptop:
- If using a TSW-770 touchscreen, download the latest version of ShowRunnerCLC™ from the Chief Integrations Portal
- If using any other TSW (e.g. a TSW-1070 or TSW-xx60), download the CI_ShowRunner-UI_v3.xxx.puf file from the same link
- Double-click the downloaded .puf file to open the Crestron Package Update Tool
- When prompted, point the Package Update Tool to the IP address of the TSW
- Press the Recheck button
- Click the checkbox next to the "Update TSW-xxx...."
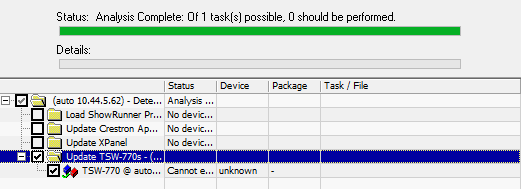
- Click the Update button to begin updating the TSW
- Repeat for all TSWs on the job
Restricting Visible Areas
If requested, Chief Integrations will restrict TSWs to only show certain areas. This feature is useful if there are some areas you don't want any touch screens to be able to control (e.g. an exterior area that is on a photocell), or if you want to restrict certain touchscreens to certain areas (e.g., only allow touchscreens to control areas on the same floor as the screen itself).
If Chief Integrations has not configured touchscreens this way, or if new areas have been created or deleted, then it may be necessary to edit or update the configuration file yourself to restrict the visible areas for a touchscreen. This is done by opening the configuration file in a text editor of your choice (Notepad++ or VS Code recommended) and then navigating to the "Touchpanels": {} section: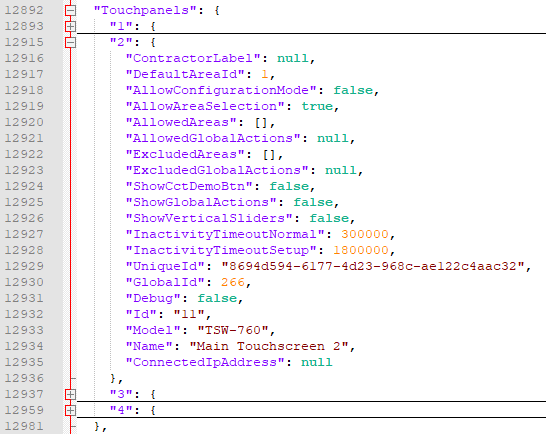
If startup has already been begun, be sure to pull the latest configuration from the processor rather than editing the configuration that was shipped in order to avoid losing any progress.
The "Id": attribute indicates the IP-ID of the touchscreen that will be modified.
Adding a comma-separated list of AreaIds to the "ExcludedAreas": [] attribute will exclude those areas from being visible in the Area Selection menu of the Area Overview screen, but will not exclude those areas from other settings menus (e.g. the Scheduler). Any newly created areas will be visible on the touchscreen.
Adding a comma-separated list of of AreaIds to the "AllowedAreas": [] attribute will exclude all areas not explicitly listed from the Area Selection menu of the Area Overview screen. Any newly created areas will not be visible on the touchscreen unless explicitly added to this list.