Custom Logo
Last modified by Austin Weygandt on 2026/04/09 19:53
CONTENTS
Custom Logo Guidelines
To use a custom logo in your ShowRunnerCLC™ project, you should first create a custom logo per the following guidelines.
Custom logos should have a white background and be in .png format with a resolution of 1280x800 for compatibility with the widest range of of touch screens.
- TSW-770 and TSW-1060 screens have an aspect ratio of 16:10 and a native resolution of 1280x800.
- TSW-1070 screens have an aspect ratio of 16:10 and a native resolution 1920x1200.
- TSW-760 screens have an aspect ratio of 17:10 and a native resolution of 1024x600.
Loading a Custom Logo to the Processor
Once a custom logo has been created, it must be loaded to the processor (not to the touchscreen itself).
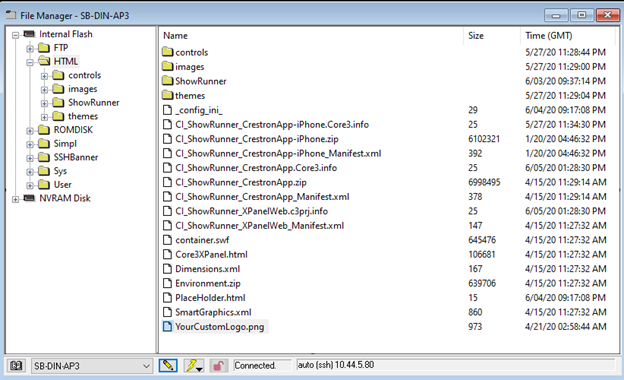
- Start Crestron Toolbox and open the File Manager tool
- Connect to the lighting control processor that the TSW touch screen is pointed at
- Select "Internal Flash" from the list on the left
- Select "HTML" from the list on the left
- 4-Series processors have a lowercase "html" folder that must be used instead: the correct folder for any processor can be identified by the presence of other ShowRunnerCLC™ files, such as "sr.html", "CI_ShowRunner_CrestronApp.zip", etc.
- Right-click in an empty area on the right and select "Copy File(s) From..."
- Select your custom logo .png file and load it to the processor
Updating the Lighting Configuration File
Once the logo has been loaded to the processor, it is necessary to update the lighting configuration file.
- First, pull the configuration file using either ShowRunner's File Management page (recommended), or pull it directly from the processor using Toolbox's File Manager tool.
- If using Toolbox's File Manager tool, the config will be located in one of two places:
"NVRAM/sr/default/SrConfig.json" for ShowRunner versions 3.011 and newer
"NVRAM/CiLightingConfig.json" for ShowRunner versions 3.010 and older
- If using Toolbox's File Manager tool, the config will be located in one of two places:
- Open the configuration file in a text editor and the locate the "CustomLogoFile" line towards the bottom of the config:

- Change the value null to the name of your custom logo file:

- Save the updated configuration file
- Load the updated configuration file to your processor using either ShowRunnerCLC's™ File Management page or using Toolbox
- If using Toolbox, navigate to either:
"NVRAM/sr/default" for ShowRunnerCLC™ versions 3.011 and newer
"NVRAM" for ShowRunner versions 3.010 and older - Open Text Console and connect to the processor and type the progreset command and then press enter to restart the processor and finish loading the config
- If using Toolbox, navigate to either:
Custom Logos on Processors with Authentication Enabled
If your project is running on a 3-series with authentication enabled or a 4-series with user page authentication enabled, you will need to follow these additional steps.