Addressing Devices in the ShowRunnerCLC™ UI
All Crestron lighting control programs function on the same basic principles with regard to addressing devices. The lighting control program maintains an internal database of controlled hardware (i.e. load controllers, keypads, sensors, etc.) which are each given a unique address. These unique addresses, as defined in the program, include the device connection ID (a.k.a. Cresnet ID) of the controlled device, the device host id (i.e., the ID of the device where the Cresnet or Zūm Link cable is landed), and the device host branch (for cases where the host device has multiple Nets, such as the DIN-CENCN-2).
In order for the lighting control program to function, all of the devices that it is meant to control must be addressed. Since there are often multiples of the same model device on a job, it is important to be able to distinguish between them (e.g. we need the keypad in the kitchen to control lights in the kitchen and not in the office). In order to uniquely identify each individual device, every device is given a globally unique serial number which is printed on the device at the factory. These serial numbers and the associated touch-settable ID (TSID) are reported to the processor when the device is connected. If the serial number for a given device is known, it can be used to assign that device the correct address for the program.
Serial numbers should be collected by the electrical contractor during installation and provided to the lighting controls technician prior to startup.
Device Addressing in the XPanel UI
Cresnet devices can be addressed from the ShowRunnerCLC™ UI if their serial numbers are known. (Note that Zūm Wired devices cannot currently be addressed from the ShowRunnerCLC™ UI because their serial numbers cannot be directly translated into TSIDs. Instead, they must be addressed through Toolbox.)
To address devices in the ShowRunnerCLC™ UI:
- Configure the processor and load the configuration file
- If other network devices are present, they should also be configured
- Launch the ShowRunnerCLC™ XPanel UI and connect to the processor
- Navigate to Settings>Device Addressing
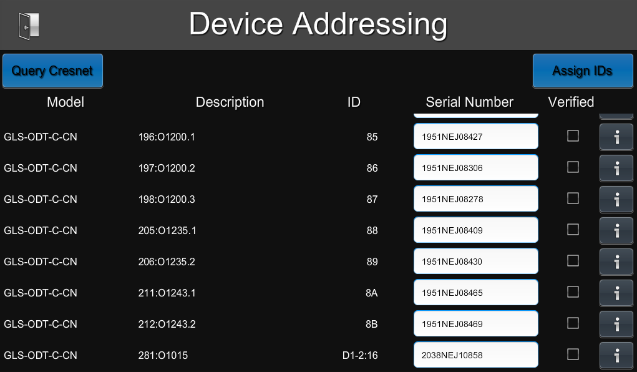
- This page lists all devices that are defined in the program, sorted by ID:
.
- "Model" column indicates the expected device model (e.g. C2N-CBD-P, GLPP-DIMFLVCN-PM, GLPP-1DIMFLV2CN-PM, etc.)
- "Description" gives the Global ID and label for any associated devices (including any non-system sensors)
- "ID" lists the device address in the form: [HostDeviceID]-[HostBranch]:[ConnectionID]
- Devices with no host (i.e. directly landed on the processor) will only have the Connection ID listed
- "Serial Number" must be populated with the device serial number
- On a new installation, this column will not be populated
- "Verified" checkbox will appear once certain conditions are met:
- There is a device reporting online at the given ID/Address
- The model of the device reporting online matches the model defined in the program
- The serial number of the device reporting online matches the serial number defined in the program
- Fill in the "Serial Number" column with serial numbers provided by the electrical contractor
- If the EC did not provide serial numbers, it may be easier to identify and address devices through Toolbox
- Note that there is sometimes a rendering issue which will make it appear as though serial numbers disappeared or moved between devices. This issue is graphical only, and does not affect addressing
- Once serial numbers have been input, press "Assign IDs"
- Once the button returns to "Assign IDs" from "Assigning IDs", press "Query Cresnet"
- Once the query has been completed, the "Verified" column should have check marks for all addressed devices
If devices do not show up as "Verified", there may be several explanations. Pressing the "i" button will give you device-specific information:
- There should be check boxes next to "Models Match", "SN Match", and "Online". All three boxes must be checked for the "Verified" check mark to appear
- If the "Models Match" check mark is missing, verify that the reported model matches the model in the configuration
- If the "SN Match" check mark is missing, verify that you have the correct serial number entered
- If there is a "Capture Reported Serial Number" button next to the "Serial Number" field, it can be used to record the serial number of the device to see what the serial number is for the device currently at that address.
- If the "Online" check mark is missing, then there is no device reporting online at that Host Device/Branch and Connection ID
- As of June 2022, issues have been reported with Crestron's Device Database that results in processors being unable to properly query devices:
- Run the command broadcast on command in Text Console
- With Text Console open, press "Query Cresnet"
- Text console will populate with messages such as "Querying cresnet" and "Querying Cresnet Bridge: [x]". If these are followed by message(s) saying "Warning: [...] Failed Querying Cresnet devices on [x]" then you are encountering this issue
- As long as the "Online" box is checked in the Device Details menu, then the device should function
- If there are issues with functionality, try rebooting the processor using the reboot command in Text Console
- Certain models (such as 277V variations of CLX modules) do not exist in the database, so the reported model will never match
It is also possible to address individual devices, without re-addressing all devices in the program:
- Locate the device in the Device Addressing menu
- Press the "i" icon
- Update the "Serial Number" field
- Press "Address Device"
- Press "Close"
- Press the "Query Cresnet" button
