Addressing Devices from Toolbox
In ShowRunnerCLC™, all hardware on the job is defined in the configuration so that it can be registered with the processor when the program starts. Once the program has been installed and all hardware is reporting online, the program still will not work unless the hardware has been addressed according to the config.
The hardware definitions in the configuration (which are reflected in the SRTakeoff) are based on the approved submittals provided by the Crestron Agent. If the as-built conditions do not match the submittals, then it is generally preferable to modify the installation (i.e. move Cresnet cables around, reconnect devices, etc.) so that the as-built conditions match the design as given in the submittals. If this cannot be accomplished, then the configuration may be modified to match the as-built conditions, though some restrictions still apply (e.g. the limit of 25 devices per Net on a DIN-CENCN-2 is a hard limit built into the hardware and there is no software workaround).
Some the following is a non-exhaustive list of some of the details which require configuration changes to implement:
- Specific host device (e.g. the specific DIN-CENCN-2, CEN-GWEXER, or processor that a device is connected to)
- Specific net of the host device (e.g. whether a device is landed at Net 1 or Net 2 of a DIN-CENCN-2)
- Specific Connection ID or Network ID of the device
Network Device Tree View
Network Device Tree View is the most user-friendly way of manually addressing devices for Crestron systems. Below is information specific to using the Network Device Tree View tool to address devices; see our Toolbox Basics page page for more general information on using and configuring the tool.
Below are some tips and things to keep in mind when using the Network Device Tree View tool to address devices for a ShowRunnerCLC™ deployment:
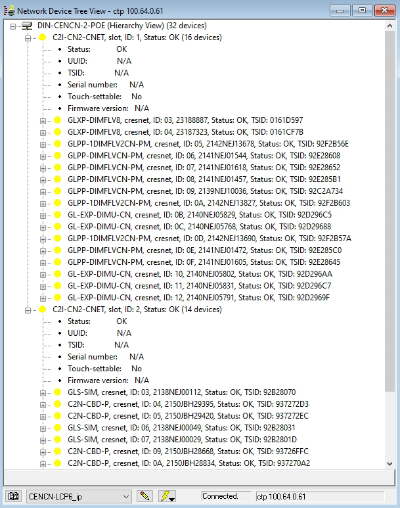
- It is generally recommended to right-click and ensure that "Show by Device Connection" is checked. While "Show by Category" can be useful in some situations, it is not recommended when addressing devices as it gives no indication which Net a device is connected to and may lead to accidentally misaddressing devices. "Show by Device Connection" will group devices by their connection to the host device (e.g., Cresnet devices on a DIN-CENCN-2 will be sorted by the Net that they are connected to, Zūm Wireless devices will be sorted by the ZUM-NETBRIDGE they are connected to, etc.).
- In the below screenshot, all devices have already been addressed so all devices appear with the yellow circle indicating "Status: OK"
- A new system where all devices are online but have not been re-addressed may look more like the following example, with a red exclamation point indicating duplicate Network IDs (all devices ship from the factory with the same Network ID, which inevitably leads to duplicate IDs on an uncommissioned system)
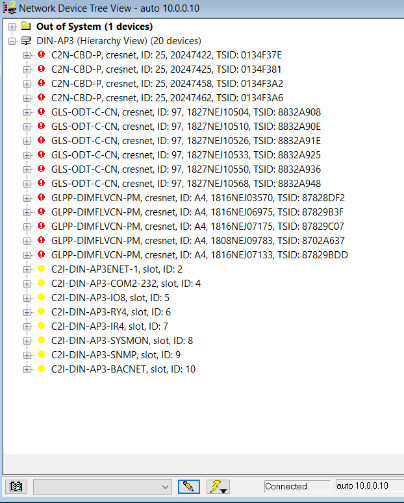
- Other types of status indicator may include a black circle for "Invalid Network ID" or "Invalid/duplicate TSID or Serial Number"
- In the below screenshot, all devices have already been addressed so all devices appear with the yellow circle indicating "Status: OK"
- To address an individual device, open the Change Network ID dialog by:
- Select the device so that it is highlighted and press the F2 key (you may need to hold down the "Fn" button on your laptop)
- Right-click on an individual device and select "Change Network ID..."
- With the Change Network ID dialog open, type the new hexadecimal Network ID for the device into the "New Value" field and click "OK"
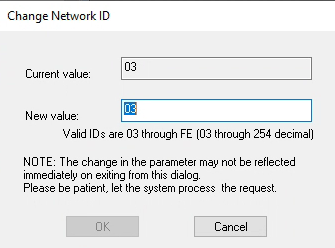
- After a few moments, the device should update its ID and the updated ID should be displayed
- If the displayed ID is not updated and there is a message at the bottom of the tool which reads "Cannot set primary ID for [x] device" or there is a button reading "Errors", then there may be Cresnet/ZUMLINK wiring issues or some other issue specific to the individual device that could not be addressed
- If the displayed ID is not updated but there is no error message, try refreshing the results by pressing F5, right-click "Refresh All", or closing and reopening the Network Device Tree View tool
Text Console
With the correct preparation, the Text Console can be a much faster way of addressing devices as compared to Network Device Tree View since it is possible to rapidly address multiple devices near-simultaneously instead of being restricted to addressing one device at a time. Some caveats for addressing through Text Console are:
- You must know the TSID of the device to be addressed
- This can be obtained through Network Device Tree View or by using the ppndiscover command (this command returns all online devices listed with their model, Network ID, and TSID)
- Devices which have a 1:1 correlation of serial number to TSID can also be converted using an Excel plugin or with the "Utility > Serial/TSID Conversion..." menu in Toolbox
- Using Excel's CONCAT() function can be useful for automatically constructing the necessary console commands provided the Takeoff has been kept up-to-date with the TSID and required Network ID for each device
The command required for addressing a device varies by the host device you are connected to:
- For Cresnet devices without Nets (such as processors and GLPACs):
- setcresnetidbyppn [CID] [TSID]
- [CID] is the network ID for the device as dictated in the Takeoff/configuration (hexadecimal value as low as 03 with a variable maximum value determined by host device)
- [TSID] is the touch-settable ID of the device
- For Cresnet/ZUMLINK devices with Nets (such as DIN-CENCN-2s and ZUMNET-JBOXs):
- setcresnetidbyppn [NET] [CID] [TSID]
- [NET] is the net that the device is landed on (for DIN-CENCN-2s, this is either "1" or "2"; for ZUMNET-JBOXs this is always 1)
- [CID] is the network ID for the device as dictated in the Takeoff/configuration (hexadecimal value as low as 03 with a variable maximum value determined by host device)
- [TSID] is the touch-settable ID of the device
- For RFID devices (such as CEN-GWEXERs):
- setrfidbytsid [CID] [TSID]
- [CID] is the network ID for the device as dictated in the Takeoff/configuration
- [TSID] is the touch-settable ID of the device
Troubleshooting Tips and Tools
When addressing devices, there are a number of issues that can occur. The causes of these issues can vary wildly and troubleshooting them requires taking a methodical approach to narrowing potential causes of the issue. Below are some general tips for troubleshooting Cresnet, but is by no means exhaustive and learning to troubleshoot low-voltage data is a skill that can only really be developed through experience.
General Troubleshooting Tips
- Verify cables are landed at the correct ports
- As mentioned above, the specific Net is relevant for the program to function correctly
- There are limits to the amount of power available, and arbitrarily moving where cables are landed may inadvertently result in overdrawing power on some of the ports and lead to issues
- Isolate cables (plug in one at a time) to verify that only the expected devices are online
- When isolating cables, it also becomes possible to check for loops in the Cresnet cabling by verifying that each Cresnet cable has unique devices online (i.e., that there are no devices that report online from two different cables) and that there are no cables which have 24V DC across the red and black wires when they are unplugged
DIN-CENCN-2 Specific Tips
There are some unique console commands and features available on DIN-CENCN-2s that provide additional information about potential Cresnet wiring issues:
- The cnettest console command will provide information such as power fault, shorts between two of the 24/Y/Z/G wires, communication issues at specific devices, among others
- Navigating to the DIN-CENCN-2 IP address in a web browser will bring up the web UI (default credentials are "admin" for both username and password), where you can view the power draw broken down by Net
Combining these additional diagnostic tools with the basic troubleshooting technique of isolating cables can provide additional insight into potential wiring issues.