Floorplans - Upload and Configure on showrunnerHUB™
Last modified by Alexander Mott on 2025/05/23 21:55
Upload Map - Youtube Tutorial - Add and Associate Map
- Login to ShowRunnerHUB™
- Click on the setup gear in the upper right corner
- Click on the Maps tab
- Click Add Map
- Files must be in SVG (preferred) or PNG format
- If zooming in on a PDF floorplan does not cause the floor plan to become blurry, then it should be able to be converted to SVG using a vector graphics editor (Inkscape is a free software, but may not work with every PDF)
- If zooming in on a PDF floorplan results in the image blurring, then the PDF has been rasterized and will need to be converted to a .png in order to be used
- Fill in form
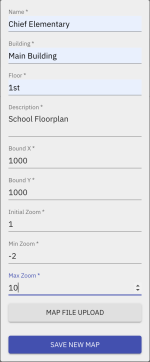
- Bound X -Image Resolution or start with 1000
- Bound Y – Image resolution or start with 1000
- Initial Zoom – Start with 1
- Min Zoom – Start with -2
- Max Zoom – Start with 10
- Upload Image using Map File Upload Button
- If you are running ShowRunnerCLC™ 3.10 and below follow these steps:
- If file image is over 1mb, click “Save new map.” It will appear as though the map uploads, but it won’t due to Crestron limitation.
- Manually transfer the file to NVRAM -> sr-graphics
- Refresh the page
- If file image is over 1mb, click “Save new map.” It will appear as though the map uploads, but it won’t due to Crestron limitation.
- If you are running ShowRunnerCLC™ 3.10 and below follow these steps:
- Associate Map
- Navigate back to main ShowRunnerHUB page
- Click either ShowRunnerHUB logo in upper left corner or select Area View
- Select root node
- Click Hamburger menu select Add Node
- Select Newly created Node
- Click Hamburger menu on New Node and Associate Map
- Choose map from list that was uploaded earlier
- Refresh and map will appear
- Navigate back to main ShowRunnerHUB page
Draw and Configure - Youtube Tutorial - Draw and Configure
- Add Areas
- Click on Settings gear icon
- Click on Add Area Tool
- Draw points around area you are creating
- Once area is completed, chose area to associate to the object in drop down
- Area is created
- Change Color of Areas
- Click on any area
- Select from available colors or use hex color
- Click save
- Click Gear to Exit Editor